You've decided to build your own fence. That's a solid call — PVC fencing is one of the more DIY-friendly materials out there, and plenty of our customers do a great job of it without any trade experience. But before you dig a single hole, there are a few things worth sorting out first. Getting this part right saves you time, money, and arguments with your neighbour.
This guide walks through everything you need to have in order before you start building. It's written for homeowners doing it themselves, but if you're a contractor, it's a handy one to send to customers who are thinking about the DIY route.
In this guide:
- Dial Before You Dig — check for underground services
- Talk to your neighbour — boundary fences involve both sides
- Check your council rules — height limits, approvals, heritage areas
- How to measure your fence line
- What equipment you'll need
- Materials — how to work out what you need
- A rough order of operations — the steps ahead
Dial Before You Dig
This one comes first because it's the most important. Before you put a shovel or auger anywhere near the ground, you need to know what's underneath it.
Dial Before You Dig is a free service — you call 1100 or lodge a request online, and the utility companies send you plans showing where their underground services run across your property. That includes gas, electricity, water, sewer, and telecommunications.
It's not optional. It's a legal requirement in Western Australia before any excavation work, and that includes digging post holes. A post hole auger will go through a gas line or a comms cable without any trouble at all, and you don't want to find out the hard way where those services are.
Lodge your request a few days before you plan to start. The plans usually come through within two business days, and they're valid for a set period (check the paperwork — it varies by utility). Once you have the plans, mark out where the services run so you can see them when you're setting out your post positions.
We've written a separate guide on Dial Before You Dig that covers exactly how to lodge a request, how to read the plans, and what to do if a service line runs right through your fence line.
The short version: Call 1100. It's free. It takes five minutes to lodge online. Do it before you do anything else.
Talk to Your Neighbour
If the fence sits on or near the property boundary, your neighbour is involved — whether you like it or not. In Western Australia, the Dividing Fences Act 1961 sets out how boundary fences work, who pays for what, and what happens when you can't agree.
The general rule is that both property owners share the cost of a "sufficient fence" equally. What counts as a sufficient fence depends on your local council, but in most Perth metro areas it's a 1.8 metre non-masonry boundary fence.
Here's what you want to sort out with your neighbour before you buy anything:
- Are they on board? Let them know you're planning to replace or build a fence and what material you're thinking. Most people are happy to get a new fence — it's just good manners to talk to them first.
- Who's paying what? If you're replacing a shared boundary fence, you can ask your neighbour to contribute half the cost. If you're upgrading to something more expensive than a standard fence, you might need to cover the difference yourself.
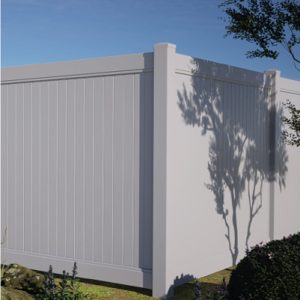
- Which side faces where? With PVC fencing, both sides generally look the same, so this is less of an issue than it is with timber or Colorbond. But it's still worth confirming the fence position on the boundary.
- Height and style. If your neighbour has a concern about height or style, it's better to hear about it now than after the fence is up.
If your neighbour isn't responsive or you can't reach an agreement, the Dividing Fences Act has a formal notice process. Our guide to the WA Dividing Fences Act explains how that works step by step.
If you're fencing a boundary that doesn't adjoin another residential property — like a back fence onto a laneway or reserve — the rules are different. Check with your local council.
Check Your Council Rules
Every local council in Perth has its own rules about fencing, and they're not all the same. Before you start, you need to check what your council allows for your property.
The main things to look up:
- Height limits. Side and rear fences are usually limited to 1.8 metres. Front fences are almost always lower — typically 1.2 metres solid, with anything above that needing to be visually permeable (pickets, slats with gaps).
- Front fence permeability. Most councils require front fences above a certain height to have gaps so you can see through them. This is about streetscape and sightlines. PVC picket and semi-privacy fencing generally meets these requirements, but check the specifics for your council.
- Heritage areas. If your property is in a heritage zone, stricter rules apply — sometimes much stricter. You may need development approval even for a standard front fence.
- Materials. PVC fencing up to 1.8 metres generally doesn't need a building permit in WA (masonry does once it's above 750mm). But check with your council to confirm.
- Setbacks and sightlines. Near driveways and street corners, fences often have to be lower so drivers can see. Your council will have specific measurements for this.
We've been writing council-specific fencing guides for suburbs across Perth — have a look at our resources page to see if your area is covered. If your council isn't listed yet, give the council's planning team a call. They'll tell you what you can and can't do, and whether you need any approvals.
Worth knowing: Most standard side and rear PVC fences (up to 1.8 metres, non-masonry, not in the front setback) don't need development approval or a building permit. Front fences are where it gets more specific — always check before you build.
How to Measure Your Fence Line
You need accurate measurements to work out how much material to order. Pacing it out or guessing won't cut it — even being a metre off can mean you're short a panel or you've ordered too much.
What you'll need
A long tape measure (at least 8 metres, ideally 30 metres if you have one), a notepad, and a pencil. If the fence line is long or has multiple sections, it helps to sketch a rough plan as you go.
Measuring a straight run
Start at one end of the fence line and measure to the other. If you're replacing an existing fence, measure along the boundary — not along the old fence, which might not be straight. If you have a survey peg or boundary marker, use that as your starting point.
For runs longer than your tape measure, put a peg in the ground at the end of each tape length so you don't lose your place.
Corners and changes of direction
Measure each straight section separately and note where the corners are. At each corner, mark whether it's an inside corner (like the corner of a backyard) or an outside corner, because this affects the post and bracket configuration.
Slopes
If the ground slopes along the fence line, you've got two options for how the fence follows it:
- Stepped: The fence goes in level sections that step down with the slope, like a staircase. Each panel is level, but there's a gap at the bottom of each step. This is the easier option for DIY.
- Raked: The fence follows the slope of the ground, so the panels angle with the terrain. This gives a cleaner look on gentle slopes but requires more precision when setting posts. Not all fence styles can be raked — give us a call and we can let you know what works for your situation.
For slopes, measure the horizontal distance (along the ground) and note approximately how much the ground drops over the run. This helps when working out post heights and panel configurations.
A few tips
- Measure twice. It's an old line for a reason.
- Write everything down as you go — don't try to remember it.
- If you have a site plan or survey from when you bought the property, it's a useful reference for boundary positions.
- Take a few photos of the fence line, especially at corners, slopes, and anywhere there's a retaining wall or obstacle. These are handy when you're working out your order.
What Equipment You'll Need
Most of this is standard stuff you might already have in the shed. The main thing you'll likely need to hire is a petrol auger — unless you're only doing a few holes, in which case a shovel and a bar will do the job.
What you probably already have
| Tape measure | For measuring post positions and checking everything is where it should be |
| Spirit level | For checking posts are plumb (vertical) and rails are level |
| Pencil and notepad | For marking measurements and keeping track of your layout |
| Shovel | For clearing spoil from post holes and mixing concrete |
| Hammer | For knocking in pegs and stakes |
| Work gloves and safety glasses | Eye protection especially when cutting or drilling |
What you'll need to get
| Shovel, petrol auger, rock bar | A shovel and a bar will get you through a few holes in soft ground. For anything more than four or five posts, hire a petrol auger from Kennards or Bunnings — it'll save your back and your weekend. If you hit limestone (common in older coastal suburbs), you'll need a rock bar or jackhammer to get through it. |
| String line | For setting out the fence line and making sure your posts are in a straight row. You can pick one up at any hardware store for a few dollars. |
| Pegs or stakes | Timber pegs for marking post positions and anchoring your string line. |
| Concrete premix | For setting posts. Standard premix (just-add-water) is the best choice for DIY — it gives you time to adjust your posts before it sets. Quick-set exists but it hardens in about 15 minutes, which doesn't leave much room for error if you're new to fencing. We'll cover the right amount per post in the materials section below. |
| Saw | A fine-tooth handsaw or a drop saw for cutting PVC rails to length if needed. PVC cuts cleanly and easily — you don't need anything heavy-duty. |
| Drill | A cordless drill for fixing brackets and fittings. |
If you're hiring a petrol auger, book it for the day you plan to dig — they go quickly on weekends. Most Perth hire companies (Kennards, Coates, Total Eden) will have 150mm or 200mm auger bits, which is what you'll need for standard PVC fence posts.
Materials — How to Work Out What You Need
Once you've got your measurements, you can start working out how much material to order. Here's a rough guide to get you in the ballpark — but the easiest thing to do is give us a call with your measurements and we'll help you work out exactly what you need.
Posts
PVC fence posts are spaced to match the panel width — typically every 2.4 metres. So for a 12 metre fence run, you'd need six posts (one at each end plus four in between). Add extra posts for corners, gate openings, and the start and end of each run.
Rails
Rails run horizontally between the posts and support the panels. Most PVC fencing uses two or three rails depending on the height — shorter fences use two, taller fences use three. The number of rails you need matches the number of panels multiplied by the number of rails per panel.
Panels, pickets, or slats
This depends on the style of fencing you've chosen. Privacy fencing uses full panels that slot between the rails. Picket fencing uses individual pickets fixed to the rails. We can help you work out the quantity once we know your fence style and total length.
Post caps
One per post. They finish off the top of the post and keep water and debris out.
Concrete
You'll need concrete to set each post. As a rough guide, allow one to two bags of quick-set post mix (20kg bags) per post hole, depending on the hole size and how firm the ground is. Sandy Perth soil usually needs a bit more concrete than harder ground.
The easy option
Honestly, the simplest way to get your materials list right is to give us a call. Tell us what style of fence you want, how many metres you're doing, whether the ground is flat or sloped, and where your corners and gates are. We'll put together a list of exactly what you need so you're not guessing and you're not buying more than you have to.
Give us a call on (08) 9302 8035 with your measurements and fence style, and we'll help you work out your materials list. If you'd rather sort it out in person, you're welcome to come into the factory in Malaga — it's easier to explain things when you can see the product.
A Rough Order of Operations
Once you've done all your planning and your materials are ready, here's the general order of how a PVC fence goes up. Each of these steps has its own detailed guide — we'll link them here as the series comes together.
- Set your string line. This is the foundation of a straight fence. Get this right and everything else follows. How to set a string line for fencing.
- Mark and dig your post holes. Space them to match your panel width (typically 2.4 metres), and dig to the correct depth for your post height and soil conditions.
- Set your posts in concrete. Get them plumb, get them in line with the string, and let them set before you hang anything. How to set PVC fence posts.
- Install your rails. The horizontal rails connect between posts and support the panels or pickets.
- Install your panels or pickets. This is the part that goes quickly — once the posts and rails are right, the panels slot into place. How to install PVC fence panels.
- Fit post caps and do your final checks. Make sure everything is level, secure, and sitting where it should be. Step back and have a look at it from the street side and the yard side.
The planning you do before you start — checking services, talking to your neighbour, getting your measurements right — is what makes the actual build go smoothly. Most problems with DIY fencing come from skipping the preparation, not from the installation itself.
Need a hand? If you get partway through the planning and decide you'd rather have someone else do the install, that's no problem. We can connect you with an experienced local installer who works with PVC fencing regularly. Give us a call on (08) 9302 8035 and we'll sort it out.
This guide is general information for planning a DIY PVC fence in Western Australia. Council rules, boundary positions, and site conditions vary — always confirm the specifics for your property before you start work.